Hello, welcome to my beautiful world! My name is Prisca Bush. I am a food lover; I enjoy writing about my favorite recipes.
Introduction
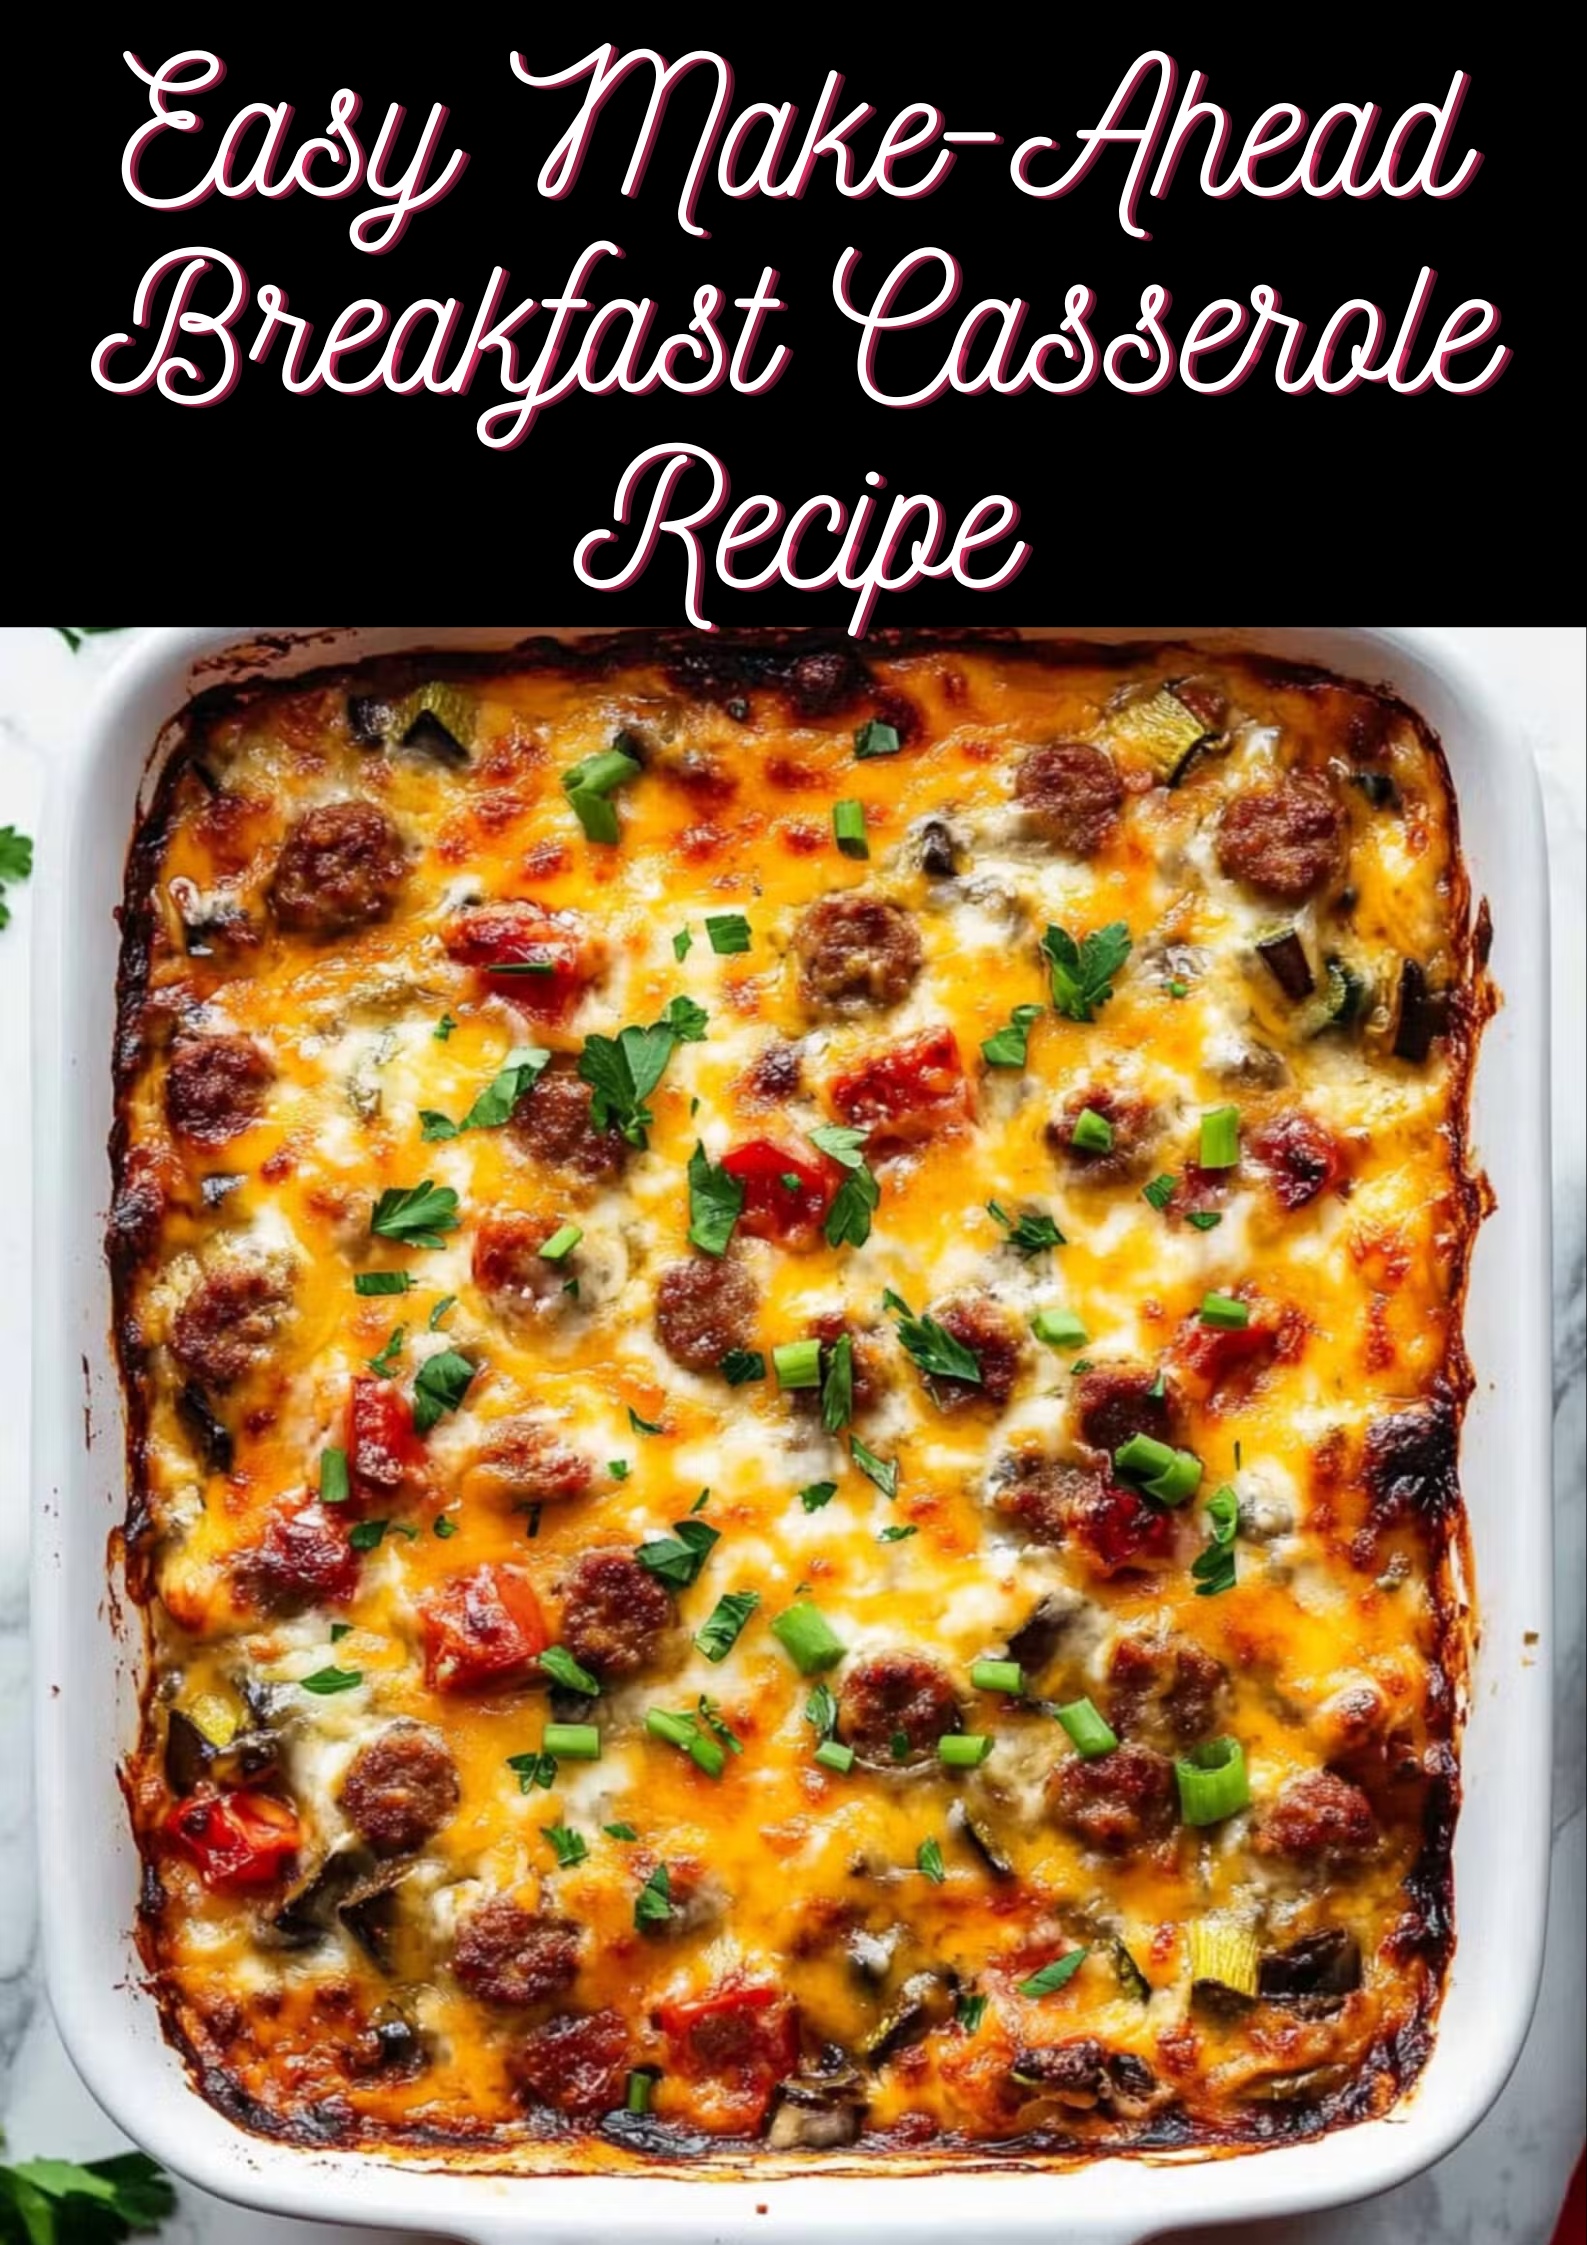
I’ll never forget the morning I woke up late to host brunch for friends. I’d promised something delicious, but the hours marched faster than I anticipated. In a moment of panic, I remembered a recipe I’d bookmarked: an Easy Make-Ahead Breakfast Casserole Recipe that you assemble the night before and bake in the morning. The idea was pure salvation.
So the night before, I cubed stale bread, browned sausage, sautéed peppers and onions, whisked eggs and milk, layered everything, covered it, and tucked it into the fridge. The next morning, I simply slid the dish into the oven. The house filled with warm, savory aromas as the casserole puffed and set. When my guests arrived, I served piping hot squares of cheesy, eggy goodness with minimal stress. The applause—and empty casserole dish—was reward enough.
That experience converted me into an Easy Make-Ahead Breakfast Casserole Recipe believer. Over time, I refined the balance of bread, eggs, dairy, vegetables, meats, and cheese so the dish is flavorful, moist (not soggy), and forgiving. Below is my go‑to version plus tips so yours turns out beautifully every time.
Do you want more recipes?
Spicy Korean Carrots Recipe – A Flavorful Crunchy Side Dish
Baked Cinnamon Sugar Donuts Recipe
Why Make Ahead? The Advantages
Before diving in, let’s consider why make‑ahead breakfast casseroles are such a win:
- Time saver: You do most of the work ahead of time. In the morning, just bake.
- Stress relief: No scrambling eggs or frying bacon when guests arrive or when your morning is tight.
- Feeds a crowd: Scales easily to feed many people (brunch, holidays, family).
- Flexible & forgiving: You can adjust ingredients (meat, vegetables, cheese) based on what you have.
- Good leftovers: Reheats well, so you can enjoy breakfast again later.
Ingredients & Tools You’ll Need
Here is the ingredient list for my preferred make‑ahead breakfast casserole (approx. 8–10 servings). These are guidelines—feel free to adjust to your taste or dietary preferences.
Base Ingredient List
| Ingredient | Approx. Amount | Notes / Tips |
|---|---|---|
| Bread (slightly stale or day‑old) | ~4 cups cubed (½‑inch cubes) | Use crusty bread, sourdough, challah, baguette, or even croissants. Sally’s suggests crusty sourdough works well. |
| Eggs | 10 to 12 large | More eggs = more custardy structure |
| Milk (or half‑and‑half) | ~2 to 2½ cups | For creaminess; can adjust for richness |
| Cooked meat | 1 lb (e.g. breakfast sausage, bacon, ham) | Pre-cook and crumble (or use leftover cooked meats) |
| Vegetables | 1–2 cups (e.g. diced onion, bell pepper, mushrooms, spinach) | Sauté before adding so excess moisture is driven off |
| Shredded cheese | 1 to 1½ cups | Cheddar, Swiss, Pepper Jack, or blend |
| Seasonings | Salt, black pepper, optional garlic powder, dried herbs | To taste |
| Optional extras | Mustard powder, nutmeg, fresh herbs, chopped scallions | To enhance flavor |
Tools & Equipment
- A 9×13‑inch (or equivalent) ovenproof casserole dish
- Mixing bowl(s)
- Whisk or large fork
- Skillet for sautéing meat & veggies
- Frying pan and utensil for pre‑cooking meats
- Measuring cups and spoons
- Plastic wrap / foil (for overnight storage)
- Oven
- Knife & cutting board
Optional: blender for whisking eggs + milk and other liquids.
Step‑by‑Step Preparation
Below is the stepwise method to assemble, refrigerate, and bake your breakfast casserole. I’ll clearly mark when you prep ahead versus the morning of.
Night Before (or a few hours ahead)
- Grease your baking dish
Lightly grease your casserole dish with butter or nonstick spray so the mixture doesn’t stick. - Cube the bread
Cut your bread into roughly ½‑inch cubes. If the bread is very fresh and moist, you can dry the cubes a bit by leaving them out uncovered or tossing in a low oven (~300 °F) for a few minutes. Many recipes emphasize using slightly stale bread so it soaks without becoming mushy. - Cook meat & veggies
In a skillet, cook your sausage, bacon, or ham until browned. Drain excess fat. If using vegetables (onion, bell pepper, mushrooms, spinach), sauté them until softened and moisture has reduced. This ensures they don’t make the casserole soggy. - Layer the bottom
Spread the bread cubes evenly in the greased dish. Then layer the cooked meat and vegetables over the bread. - Whisk the eggs & dairy
In a bowl or blender, whisk together eggs, milk (or half‑and‑half), salt, pepper, and any seasonings (e.g. garlic powder, mustard powder, fresh herbs). Pour this mixture evenly over the bread / meat / vegetables so that the bread is well soaked.- Tip: Some recipes suggest gently pressing the bread down to ensure it’s submerged.
- Add cheese on top
Sprinkle about half of the shredded cheese over the mixture. The remaining cheese can be added in the final baking stage to melt on top. - Cover & refrigerate
Cover tightly with plastic wrap or foil and refrigerate overnight or up to ~24 hours. Many recipes note that letting the casserole sit overnight helps flavors meld and gives the bread time to absorb.If you’re prepping just a few hours ahead, the same process applies—just give the mixture as much time as feasible to rest.
Morning Of (Bake & Serve)
- Remove from fridge & preheat oven
Take the covered casserole out while the oven preheats (let it come closer to room temp). Preheat your oven to 350 °F (≈ 175–180 °C) for most casseroles, or to the temperature specified in your recipe. For example, Jessie’s version bakes at 375°F after chilling. - Bake uncovered
Remove foil or plastic wrap. Bake until the top is golden, edges are set, and a knife or toothpick inserted into the center comes out clean. This often takes 40 to 55 minutes, depending on the depth, filling, and oven. Some heavier recipes go up to ~1 hour.If the top browns too fast, loosely cover with foil halfway through. - Add remaining cheese
If you reserved cheese, sprinkle it over during the last 5 minutes and let it melt. - Rest before serving
Let the casserole rest ~5–10 minutes before slicing. This helps it set so the portions hold together. Many recipe sources recommend this. - Slice & serve
Cut into squares or rectangles, serve warm with sides and garnishes.
How to Serve & Garnish
Here are ideas to make your casserole pop on the plate:
Serving Suggestions
- Serve with hot sauce, ketchup, or salsa on the side.
- Garnish with fresh herbs (parsley, chives, basil) for color and freshness.
- Offer sliced avocado or tomato slices to lighten the dish.
- Side of fresh fruit or fruit salad to offset heaviness.
- Add a side of bread or toast or biscuits to round out the meal.
- Pour coffee, fruit juice, or mimosas for a full brunch experience.
Because the casserole is hearty, pairing with bright or fresh sides helps balance the plate.
Variations & Flavor Twists
The beauty of a breakfast casserole is how customizable it is. Here are many ways you can adapt to your taste or dietary needs:
| Variation | What to Change / Add | Notes & Ideas |
|---|---|---|
| Vegetarian / veggie‑heavy | Omit meat; increase vegetables (spinach, broccoli, peppers, mushrooms) | Primavera Kitchen’s veg version uses 2 cups broccoli, mushrooms, spinach, onions, eggs & cheese. |
| Hash brown / potato base | Use frozen shredded hash browns or tater tots as the bottom layer instead of bread | Bon Appétit’s hash brown breakfast casserole is a popular variation. |
| French toast style | Use day‑old bread cubes plus a bit of sugar and vanilla in egg mixture | Gives a slightly sweet twist |
| Mexican / southwestern | Add diced chiles, salsa, black beans, corn, pepper jack cheese | Give it heat and bold flavors |
| Ham & cheese | Use diced ham + Swiss or Gruyère cheese, perhaps with a touch of nutmeg | Martha Stewart’s holiday version uses Canadian bacon, spinach & Gruyère. |
| Crustless (low carb) version | Omit bread, use more eggs, mix in cooked vegetables & meat | Works more like a strata or frittata |
| Mini / individual portions | Use muffin tins or ramekins | Ideal for portable, single‑serve breakfast |
| Sweet / dessert version | Add a touch of sugar, cinnamon, and fruit (berries, banana) | Serve with syrup or fruit compote |
| Gluten‑free | Use gluten-free bread or avoid bread and use potatoes or alternate layers | Ensure all ingredients (meat, seasonings) are GF |
FAQs
Here are common questions you or your readers might ask—along with answers to help your version succeed.
Q1: How long can I refrigerate the casserole before baking?
Usually up to 24 hours. Many “make-ahead” recipes are designed for overnight rest in the fridge. If it’s longer, bread might get overly saturated.
Q2: Can I freeze the assembled casserole?
Yes—some recipes support freezing before baking. For example, Getty Stewart’s strata version is freezer-friendly. Freeze tightly wrapped; thaw in fridge overnight before baking.
Q3: What temperature should I bake at?
Commonly 350 °F (≈ 175–180 °C) for many casseroles. (Sally’s version bakes at 375°F after chilling). Some heavier or deep ones may benefit from starting at a higher temp or baking longer.
Q4: How do I know when it’s done?
Insert a knife or toothpick in the center—if it comes out clean (no wet batter), it’s set. Edges should be slightly puffed and golden. Many instructions mention this. If top browns too fast, tent with foil.
Q5: My casserole is too soggy / wet. What went wrong?
- Bread too fresh / too moist
- Not enough baking time
- Excess liquid (too much milk, or watery vegetables)
- Too shallow or overstuffed dish
Fixes: use slightly stale bread, reduce liquid, ensure layers are pressed so egg covers but doesn’t pool, cook a bit longer.
Q6: Can I omit meat?
Yes—omit meat and increase vegetables or cheese or use beans as a protein substitute.
Q7: How long do leftovers last?
In the fridge, ~3–5 days in airtight container. Reheat in microwave or oven. Some recipes suggest using within that range.
Q8: Can I make this vegetarian / gluten-free / dairy-free?
Yes: Use vegetable fillings, gluten-free bread or alternate base, plant-based milk and alternative cheeses. Many readers adapt the base recipe structure.
Q9: Does the casserole lose quality when reheated?
It may lose some crisp edges, but flavor generally holds. Heating in an oven or toaster oven helps re-crisp edges better than microwave.
Q10: Why let it rest before slicing?
Resting helps the casserole set so slices stay intact. Cutting too early can lead to runny portions. Many recipes recommend 5–10 minutes rest.
Final Thoughts & Success Tips
A make-ahead breakfast casserole is one of those recipes that gives you peace of mind in the morning and delivers warm, comforting flavor with minimal fuss. Here are my extra tips and reflections to help yours turn out fantastic:
- Test your dish size & depth: Too deep a dish may require longer bake time; a shallow dish may cook faster.
- Dry out your bread slightly: Slight staleness helps absorb without drowning.
- Sauté vegetables & meats well: Reduce moisture and develop flavor before layering.
- Balance wet:dry ratio: Enough egg mixture to soak, but not so much that it pools.
- Use moderate cheese on top: Too much can make it soggy; reserve some to melt toward end.
- Tent foil if top browns too early: Preserve color without burning.
- Let rest before slicing: Helps set structure.
- Customize boldly: Use your favorite meats, veggies, cheeses, seasonings.
- Plan for reheating: Bake for extra minutes if starting from cold or frozen.
I still smile at that first brunch where I slid an overnight casserole into the oven, sat down with coffee, and watched friends’ faces light up as I served warm squares of savory delight. It’s the kind of breakfast that never feels like a compromise—and often ends with compliments.