Hello, welcome to my beautiful world! My name is Prisca Bush. I am a food lover; I enjoy writing about my favorite recipes.
Introduction
I’ll never forget the first time I made Red Velvet Waffles. It was Valentine’s morning, and I wanted to surprise my partner with something festive and fun. I pulled out my old waffle iron, determined to turn breakfast into dessert. Inspired by the deep red cake I loved, I wanted waffles that looked dramatic but tasted familiar.
I mixed batter nervously, poured it into the hot iron, and waited. When I opened the lid, I was greeted by a rich, bold red waffle with crisp edges and steam rising up. That first bite was electric: hints of cocoa, sweetness, and that unmistakable red velvet tang all wrapped up in a waffle’s crisp‑outside, fluffy‑inside structure.
Since then, I’ve played with ratios, glaze types, toppings, and techniques to get numbers of batches that deliver that sweet surprise on every plate. In this post I’ll guide you through the full recipe for Red Velvet Waffles, including ingredients, step‑by‑step preparation, serving ideas, helpful variations, FAQs you’ll want answered, and final reflections. Let’s make breakfast feel like a celebration.
Do you want more recipes?
Brioche French Toast with Blueberry Compote & Crème Fraîche Recipe
Crispy Rice Spicy Salmon Recipe
Ingredients & Tools You’ll Need
Below is my go‑to “base” red velvet waffle recipe (makes ~4–6 waffles, depending on size). You can scale up or down.
Ingredients (Base Recipe)
| Ingredient | Quantity | Notes / Tips |
|---|---|---|
| All‑purpose flour | 2 cups | The foundation. You may substitute part with cake flour for lighter texture. |
| Granulated sugar | ¼ cup (or ⅓ cup) | For balanced sweetness |
| Cocoa powder (unsweetened) | 1 tablespoon | Gives that chocolate‑hint classic red velvet flavor. |
| Baking powder | 1 tablespoon + 1 teaspoon (or 2½ Tbsp total) | Helps with rise and lightness (Food Network) |
| Salt | ½ teaspoon | Offsets sweetness and enhances flavor |
| Buttermilk | 1¾ cups | Contributes tang and tenderness |
| Melted butter (cooled) | ⅓ cup | For richness and tender crumb |
| Eggs | 2 large | For structure and moisture |
| Vanilla extract | 2 tsp | Adds aroma and depth |
| Red food coloring (liquid or gel) | ~2 tablespoons (or adjust) | To get that bold red hue |
| White vinegar (or distilled) | ½ teaspoon | Helps with red velvet’s characteristic tang |
Optional / Topping Ingredients
- Cream cheese glaze (or frosting) — softened cream cheese, butter, powdered sugar, vanilla, milk
- Chocolate ganache drizzle (chocolate + cream)
- Fresh berries
- Whipped cream
- Powdered sugar
- Nuts (e.g. chopped pecans) in topping/glaze
Tools / Equipment
- Waffle iron (standard or Belgian)
- Mixing bowls (dry + wet)
- Whisk
- Spatula
- Measuring cups and spoons
- Cooling rack or plate
- Small bowl / mixer for glaze
- Sifter (optional, for dry ingredients)
How to Prepare: Step‑by‑Step Guide
Here’s how I make red velvet waffles reliably. Follow these steps for the best texture, color, and flavor.
Step 1: Preheat & Prepare Waffle Iron
- Preheat your waffle iron according to its instructions.
- Lightly grease the plates with nonstick spray or brush with melted butter so waffles don’t stick.
Step 2: Mix Dry Ingredients
- In a large bowl, whisk together the flour, sugar, cocoa powder, baking powder, and salt until well combined.
- (If you like, sift the dry mix to ensure there are no lumps and the cocoa and flour are evenly distributed.)
Step 3: Mix Wet Ingredients
- In a separate bowl, whisk together the buttermilk, eggs, melted & cooled butter, vanilla extract, red food coloring, and vinegar until smooth and homogeneous.
- The vinegar contributes to red velvet’s gentle tart note and helps react with baking powder.
Step 4: Combine Wet + Dry
- Pour the wet mixture into the dry ingredients. Stir gently until just combined. It’s okay if a few small lumps remain — avoid overmixing, which can lead to tough waffles.
- Let the batter rest briefly (3–5 minutes) if your waffle iron tends to cook unevenly or your batter needs slight thickening.
Step 5: Cook the Waffles
- Spoon or ladle the appropriate amount of batter onto the hot waffle iron (amount depends on your iron size).
- Close the lid and cook until the waffle is crisp on the outside and cooked through — usually ~3 minutes, though time depends on your machine.
- Carefully remove the waffle and transfer to a cooling rack or plate while you cook remaining batter.
Step 6: Make the Glaze / Toppings
While the waffles cook (or once they’re done), prepare your cream cheese glaze or other topping.
Cream Cheese Glaze
- In a bowl, beat softened cream cheese and butter until smooth.
- Gradually whisk in powdered sugar, vanilla, and enough milk or cream to reach drizzle consistency.
Chocolate Ganache Drizzle (optional)
- Heat cream and pour over chopped dark chocolate. Let stand a minute, then whisk smooth.
- Use as drizzle over waffles.
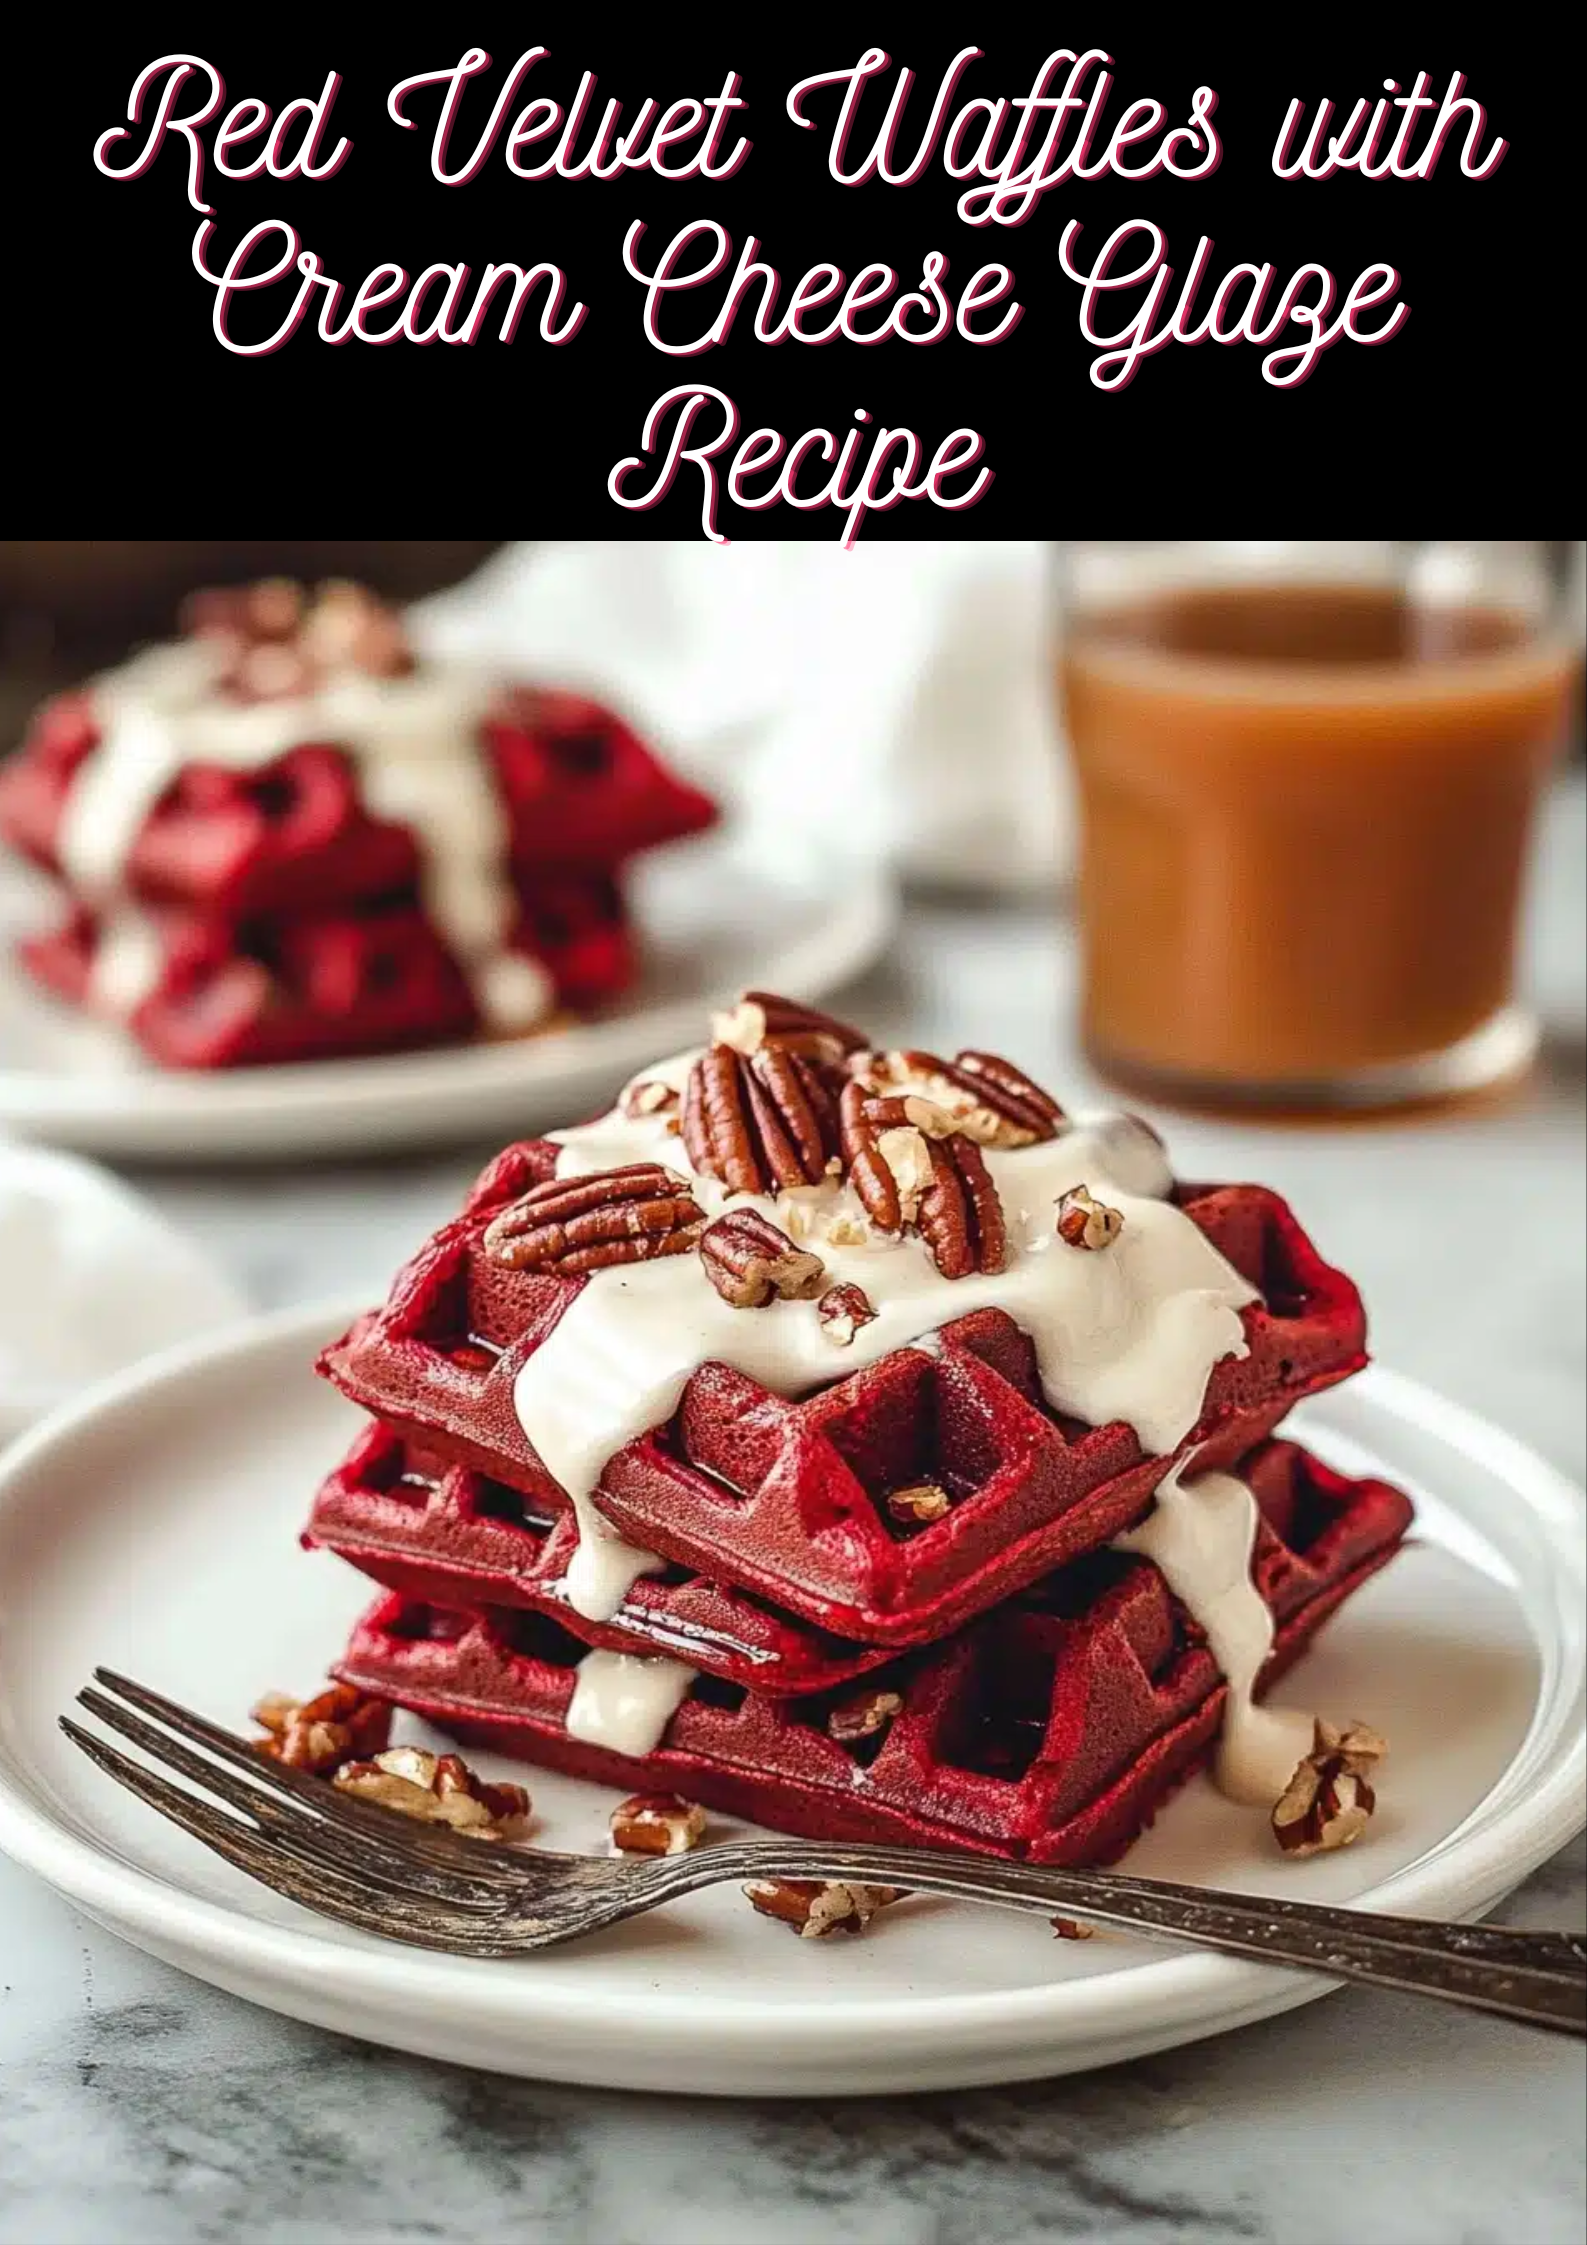
Step 7: Serve Immediately
- Stack waffles and drizzle glaze or ganache over them.
- Add fresh berries, whipped cream, dust with powdered sugar, or sprinkle nuts.
- Serve while warm, so you get the contrast of crisp edges and soft interior with flavorful topping.
How to Serve & Pairing Ideas
Red velvet waffles are deliciously indulgent, and how you serve them greatly influences the overall experience. Below are suggestions for presentation, sides, and pairings that elevate them.
Serving Styles & Plating
- Stack 2–3 waffles and drizzle glaze or chocolate in zigzags.
- Use a squeeze bag or fork to create visually appealing lines.
- Add fresh fruit (strawberries, raspberries, banana slices) on top or to the side.
- Dust some powdered sugar or cocoa powder lightly over the top for finish.
- Garnish with mint leaves or a light sprinkle of nuts for texture contrast.
Pairings & Side Dishes
- Fresh fruit salad or berries provide an acidic, fresh counterpoint to richness.
- Whipped cream or crème fraîche lightens each bite.
- Coffee, espresso, or cappuccino go naturally with the sweetness and chocolate hints.
- Chocolate or red berry sauces (strawberry, raspberry coulis) complement.
- Yogurt or Greek yogurt (if you want tang) on the side.
- Vanilla ice cream can turn this into a dessert brunch.
Because red velvet waffles are rich, balancing with fresh, bright, or slightly tart sides helps the flavor profile stay engaging rather than overwhelming.
Variations & Creative Twists
Once you’ve mastered the base recipe, here are ideas to experiment with and adapt for different tastes or occasions.
1. Marble / Swirl Red Velvet Waffles
- Split your batter: one part plain vanilla (no coloring, little cocoa), one part red velvet.
- Gently swirl them when pouring into waffle iron to get a red‑white marble pattern.
- This gives visual interest and lighter flavor contrast. (Gourmet Martha includes a “marble” version in their waffle repertoire.)
2. Extra Chocolate Version
- Add finely chopped dark chocolate or chocolate chips into the batter or drizzle more chocolate over cooked waffles.
- Use Dutch‑process cocoa for deeper chocolate flavor.
3. Vegan / Dairy‑Free Adaptation
- Use plant-based milk (almond, oat, soy) plus 1 Tbsp vinegar to mimic buttermilk.
- Use vegan butter or oil instead of dairy butter.
- Use flaxseed “egg” or other egg replacer in place of eggs.
- Use a vegan cream cheese or icing glaze for topping.
4. Healthier / Lighter Version
- Swap part of the flour with whole wheat or whole‑grain flour (but still leave enough white flour to maintain lightness).
- Reduce sugar slightly, or use less in toppings.
- Use low-fat buttermilk or milk.
- Use minimal or lighter glaze rather than full cream cheese frosting.
5. Dessert Style / Loaded Waffle
- Serve waffles as dessert, topped with more elaborate elements: ice cream, caramel sauce, berries, whipped cream, chopped nuts, shards of chocolate.
- Add a drizzle of salted caramel for contrast.
- Use them as a base for waffle sandwiches (ice cream between two waffles).
6. Mini Waffles / Waffle Bites
- Use a small waffle maker or mini waffle molds to make bite-sized red velvet waffles — perfect for brunch spreads or kid-friendly serving.
- Serve with individual small dipping jars of cream cheese glaze or chocolate sauce.
7. Flavor Additions & Spices
- Add a pinch of cinnamon or espresso powder to enhance depth without overwhelming.
- Use red velvet emulsion or red velvet bakery flavoring instead of (or in addition to) food coloring for more nuance.
- Add a small quantity of beet juice or powdered beet for a natural red coloring alternative. (Some red velvet recipes suggest beet powder in lieu of pure artificial dye.)
FAQs (Frequently Asked Questions)
Here are questions people often ask when making red velvet waffles — with answers to help you avoid pitfalls.
Q1. Why do red velvet waffles use cocoa powder?
A: The cocoa (in small amount) gives red velvet waffles their signature mild chocolate undertone. It also enhances the color contrast with red food coloring. Many red velvet waffle recipes include cocoa in their dry mix.
Q2. Can I skip food coloring?
A: Yes, though the waffles will be more muted in color (brownish) rather than vibrant red. Some recipes suggest using beet powder or natural red alternatives.
Q3. How do I prevent burning when waffles have chocolate / cocoa?
A: Because the added cocoa and chocolate elements can darken quickly, use medium heat on your waffle iron, monitor closely, and don’t overcook. Use lighter coloring in glaze or drizzle rather than heavy chocolate layers.
Q4. Can I make the batter ahead?
A: You can prepare the batter ahead and refrigerate for a short time (a couple hours), but be aware that raising agents may lose some potency. It’s usually better to cook same day for fluffiest results.
Q5. How do I reheat leftover waffles?
A: Reheat in a toaster oven, oven (≈ 350°F / 175°C) for a few minutes, or in a crisping setting (if your toaster has one). Avoid microwaving if possible, as it can make them soggy. Many sources mention that red velvet waffles freeze well and reheat crisp.
Q6. How long do waffles keep?
A: Stored in an airtight container in the fridge, they stay good ~2–3 days. In the freezer, they can last 1–2 months. Reheat as above for best texture.
Q7. Can I make gluten‑free red velvet waffles?
A: Yes. Use a gluten‑free all-purpose flour blend (with xanthan or other binders) instead of regular flour. Some red velvet waffle recipes, like one from Food Fanatic, mention a gluten‑free variation.
Q8. My waffles are soggy inside but crisp outside — what went wrong?
A: That often means the interior didn’t cook fully. Try lowering heat a little so interior cooks through before outside overbrowns. Also ensure the waffle iron is preheated well, and don’t overfill or pour too thick a batter.
Q9. Why do some recipes call for folding in beaten egg whites?
A: Folding in whipped egg whites can lighten the batter and yield fluffier waffles. Some red velvet waffle recipes use this technique to boost texture.
Final Thoughts & Tips for Success
Red velvet waffles bring that fun, festive feeling into breakfast or brunch, merging a cake‑like flavor profile with the structure of a waffle. Here are some extra tips to help your version shine:
- Test one waffle first — use a small amount of batter to gauge ideal cook time and heat level for your waffle iron.
- Adjust food coloring gradually — especially if using gel or liquid; better to add more than overshoot.
- Mind the chocolate content — chocolate or cocoa can darken fast; moderate cooking temperature is your friend.
- Balance richness with freshness — the waffles are indulgent, so offset with berries, citrus, or tart components.
- Work fast with glaze / drizzle — apply toppings while waffles are still warm so they meld nicely.
- Don’t overcrowd your iron — give each waffle space so heat distributes evenly.
- Keep cooked waffles warm (if making a batch) — use a low oven (~200 °F / 90–95 °C) or a preheated rack so you can serve warm stacks.
- Experiment with toppings & variations — once you have the base down, mix in swirl versions, extra chocolate, fruit fillings, or lighter versions for everyday.
I hope this post helps you turn your waffle iron into a red velvet celebration. Whether you make this for Valentine’s Day, birthdays, brunch with friends, or just a cozy weekend morning, may every bite delight.